
Leaking Hot Water Heater: How to Find and Repair the Leak
A puddle under the tank is a location puzzle, and the location does most of the diagnosing for you. A drip at a top fitting is often a wrench job that costs nothing. Moisture weeping through the tank's own steel is the end of that tank. Everything else sits in between. So the honest answer to how to repair a leaking hot water heater starts with a towel and a flashlight, not a parts order: find exactly where the puddle begins, then match the fix (or the phone call) to that spot. Below: the likely sources in checking order, what each costs to put right in 2026, and where a homeowner should stop.
First: Energy Off, Inlet Shut, Everything Hot
In sequence, before any detective work:
- A gas odor overrides everything. Walk the household out first, and make the two calls (911, then the gas utility's leak line) only from well outside the building. Until then, nothing indoors gets flipped, lit, or dialed. A drip can wait an hour; escaping gas cannot.
- Treat everything as hot. The tank holds a full load at whatever the thermostat is set to, and CPSC burn tables in Publication 5098 show 140F water causing a third-degree burn in about 6 seconds. Fittings, valves, and the discharge pipe can be as hot as what is inside.
- Cut the energy. Electric unit: flip its breaker. Gas model: rotate the knob on the thermostat housing low on the tank to OFF. Roughly 48% of US households heat water with natural gas and 46% with electricity (EIA household data), so use the step that matches your unit.
- Moisture touching wiring or gas controls (junction box, element access panels, the burner compartment) ends DIY on the spot. Skip to the call list at the bottom of this page.
Stop the Refill and Let the Tank Talk
- Energy off first, per the step above.
- Turn the cold-water supply off at the shutoff above the heater, so fresh water stops replacing whatever drips out.
- Do not drain it yet. A full tank makes the leak easier to trace; draining comes after you know what failed.
- Dry it all, then wait. Towel off the shell and each connection, ring the base with paper towel, and return every thirty minutes. Whichever spot darkens first is your source.
Where the Water Starts Tells You What Broke
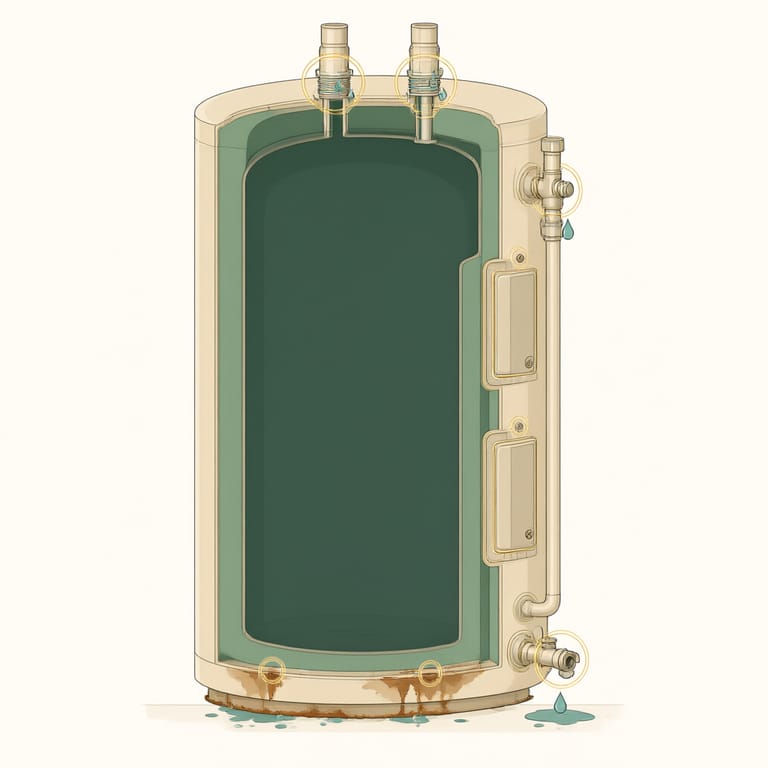
Seven places cover the leaks a tank-style unit produces. Find your wet spot in the left column first.
| Wet spot location | Usual cause | How serious |
|---|---|---|
| Top, around the pipe connections | Inlet or outlet fitting, loosened or corroded | Low: a wrench or fresh thread tape usually settles it |
| Side, at the TPR valve body | Valve relieving pressure, or a worn seat | Medium: it is telling you something |
| End of the TPR discharge pipe | Thermal expansion or overheating | Medium: investigate, never plug |
| Drain valve near the floor | Valve not fully closed, or a failed washer | Low: cheap part |
| Upper or lower panel on an electric unit | Heating element gasket seeping | Medium: gasket swap, 240V territory |
| Random drips on top of the tank in humid weather | Condensation on cold pipes | None: verify and relax |
| The tank shell itself, or steady water from under the base | Internal corrosion has breached the tank | Terminal: replacement |
Condensation or a Real Leak?
A tank full of cold refill water sitting in a warm, humid utility room sweats, and a sweating tank fakes a leak convincingly. Two tests separate them. First, timing: condensation shows up after heavy hot-water use (a big refill of cold water) and dries as the tank reheats, while a genuine leak is steady regardless of use. Second, the towel test: dry a suspect fitting, tape a paper towel to it, and come back in an hour. A damp towel with a defined wet trail means a leak. A uniform light mist across cool surfaces means sweat.
How to Repair a Leaking Hot Water Heater Yourself (Where DIY Is Safe)
Two of the seven locations above are reasonable homeowner fixes. The rest belong to a licensed pro, because the tank is a pressurized vessel of scalding water sitting next to 240 volts or a gas line.
- Loose inlet or outlet fittings. Snug the union or nipple gently, one wrench to hold and one to turn. Overtightening a corroded nipple can snap it, which converts a drip into a geyser, so if the metal looks crusty and green, stop and hand it off. Still weeping after a gentle snug? That is a thread-tape or new-nipple job, and since an old fitting may not come out cleanly, price it from a pro.
- Weeping drain valve. First open it briefly (hose to a drain, gloves on, it comes out scalding) to flush debris off the seat, then close it firmly. Still dripping? A threaded hose cap buys you time; replacing the valve itself is a basic service call, and many pros swap a thin plastic valve for brass at the same visit.
- Where DIY stops. TPR valve replacement, heating element gaskets (a drained tank plus 240-volt access panels), anything soldered, and every gas-side connection belong to a licensed pro.
Ready to talk to a licensed water heater pro?
Call (800) 555-0184Free call. A licensed local water heater installer picks up.Licensed water heater partners in your area- Licensed and insured partner network
- 24/7 call routing
- Free call, no obligation
- You approve the price with the installer directly
Never Plug a Dripping TPR Valve
The temperature and pressure relief valve is the one part on the heater designed to leak on purpose: it opens when pressure or temperature climbs past safe limits. The International Code Council's water heater safety guidance (IRC P2804.6.1) requires the discharge pipe to keep the valve's full outlet diameter, end with an air gap where you can see it drip, and never connect directly to a drain. Capping one has caused actual water heater explosions. A TPR valve that drips regularly means thermal expansion, overpressure, or a worn valve seat, and diagnosing which is exactly what TPR valve replacement covers.
When the Shell Itself Leaks
A glass-lined steel tank corrodes from the water side outward. The sacrificial anode rod draws that corrosion onto itself for years; once the rod is gone, the wall is next. By the time moisture beads through the shell or runs steadily from under the base, no patch, sealant, or weld fixes it. Storage tanks last 8-12 years by the industry planning figure (Angi, 2026), and DOE Energy Saver credits a well-maintained conventional tank with roughly 10-15 years; an anode rod swap every 3-5 years and an annual flush are what push a tank toward the upper end. A shell leak on an older unit is your cue to price a new heater, not a repair. Our repair-vs-replace guide walks the math.
What a Hot Water Heater Leak Repair Costs in 2026
Most leak repairs sit in the low hundreds; the tank itself is the expensive outcome.
| Repair | Typical range (national) |
|---|---|
| Drain valve, flush, other small fixes | $100-$350 |
| Heating element or thermostat (incl. gasket work) | $100-$350 |
| Gas control valve and complex leak repairs | $200-$750 |
| Water heater repair overall | $228-$1,017, average about $600 |
| New tank, installed (if the shell failed) | $881-$1,826 typical, average about $1,346 |
Ranges are national 2026 figures from Angi and HomeGuide; HomeGuide's full observed span for a repair visit runs from about $90 to $1,775 and up, so a simple fitting leak should quote near the bottom of that span. The full breakdown by part and labor lives in our repair cost guide.
Why Some Leaks Keep Coming Back
If you have replaced a TPR valve or re-tightened fittings and the dripping returns, the problem may be system pressure, not parts. A backflow preventer or pressure-reducing valve on the service line makes your plumbing a closed loop: heated water expands, the extra cannot push back toward the street, and every heating cycle drives pressure up until the TPR valve bleeds it off, several times a day. The lasting fix is a small expansion tank that absorbs those spikes; see expansion tank replacement. Swapping valves without addressing expansion just schedules the next drip.
Reader Questions on a Leaking Water Heater
Can you repair a leaking water heater, or must it be replaced?
That hinges on the drip's source. Fittings, the drain valve, the TPR valve, and element gaskets are all repairable parts. A leak from the tank shell or a steady stream from under the base is corrosion through the steel, and that is a replacement, not a repair.
Do I shut a leaking water heater off, and in what order?
Yes, and sequence matters: energy first, cold inlet second. An electric element left powered in a tank that drains below it can burn out (dry firing), and a gas burner keeps heating a tank that is emptying onto the floor.
Is a leaking water heater an emergency?
A slow drip from a fitting or a drain valve is a same-day job, not a midnight one: close the inlet, catch the drip, and book a pro. Spraying hot water, moisture reaching wiring or gas controls, or a shell failure is the emergency version: shut the inlet and the energy off, then make the call.
Call a Pro Now If
Knowing how to repair a leaking hot water heater also means knowing when not to. Hand it off immediately if:
- Water is reaching the gas controls, burner area, or any wiring
- Hot water is spraying, not dripping: close the cold inlet and stand clear
- The leak is coming through a ceiling from a heater on the floor above
- The stream from the tank base is rusty, which means shell failure
- The TPR valve is discharging repeatedly or steaming
Any of those, and the next step is a phone, not a wrench: (800) 555-0184 connects you with a licensed, insured local water heater pro. The call is free, partner installers pick up seven days a week, and you approve every dollar of work directly with them.
Leak solved but the hot water has gone cold too? Start at no hot water triage, or browse the full repair library for the symptom that matches yours.